I was recently tasked with helping a customer migrate fourteen servers from Azure to AWS. The time we had to complete the migration was limited and so we elected to use the AWS Application Migration Service (MGN) for the lift-and-shift migration, instead of rebuilding the servers in AWS, to minimize the complexities associated with rebuilding servers.
Forgiving some issues related to Azure drives larger than 16 TiB, thirteen of the fourteen servers replicated without issue to AWS and passed initial testing. However, the one Ubuntu Linux server would not boot during initial testing with the AWS Application Migration Service.
This article recounts the process we took to migrate the server from Azure Virtual Machines to AWS EC2 and assumes the reader has some basic experience with the AWS Application Migration Service.
Preparing the Server for Replication
After enabling and configuring the AWS Application Migration Service, you will need to register the source servers that you wish to replicate to AWS. The source server can be located anywhere with a connection back to AWS: on-premises, in a colocation, or even another cloud provider. In this situation, the source server was located in Microsoft Azure.
To register a source server in AWS Application Migration Service, you simply need to install the replication agent on the server. You can find detailed instructions for your operating system here. The basic process is as follows:
- Download the region-specific installer to your source server.
- Obtain a set of credentials that have permission to register a new source server in AWS Application Migration Hub.
- Install the agent, specifying the region that you initialized the AWS Application Migration Service and the set of credentials you obtained in the step before.
- Select the drives that you would like to replicate.
- Complete the installation, starting replication.
Notes: Volumes larger than 16 TiB are not supported by AWS Application Migration Service. Attempting to replicate any partitions on a volume larger than 16 TiB will result in an error, aborting the installation of the replication agent.
Microsoft doesn’t support shrinking Azure Disks and so I recommend adding new volumes to the server that are smaller than 16 TiB, migrating all files to the new volumes, reconfigure any file permissions and file shares, and then starting the replication agent installation.
The First Test
The AWS Application Migration Service requires you to migrate source servers in phases. The first phase, after completing initial replication, is testing the replicated server. You can begin testing the server on EC2 from the AWS Application Migration Service console.
Depending on the amount of replicated storage and how many post-launch actions were enabled, it could take somewhere between 30-45 minutes to create, boot, and complete any post-launch actions. I recommend enabling the AWS Systems Manager (SSM) agent and, at a minimum, performing volume integrity validation. With these actions enabled, it could take about 40 minutes to launch a server.
After the initial replication of the Ubuntu Linux server was finished, I launched a test server. After waiting for about 45 minutes, I began to realize that the post-launch actions weren’t going to run and noticed that the EC2 status checks weren’t all passing, suggesting an issue with the test launch.
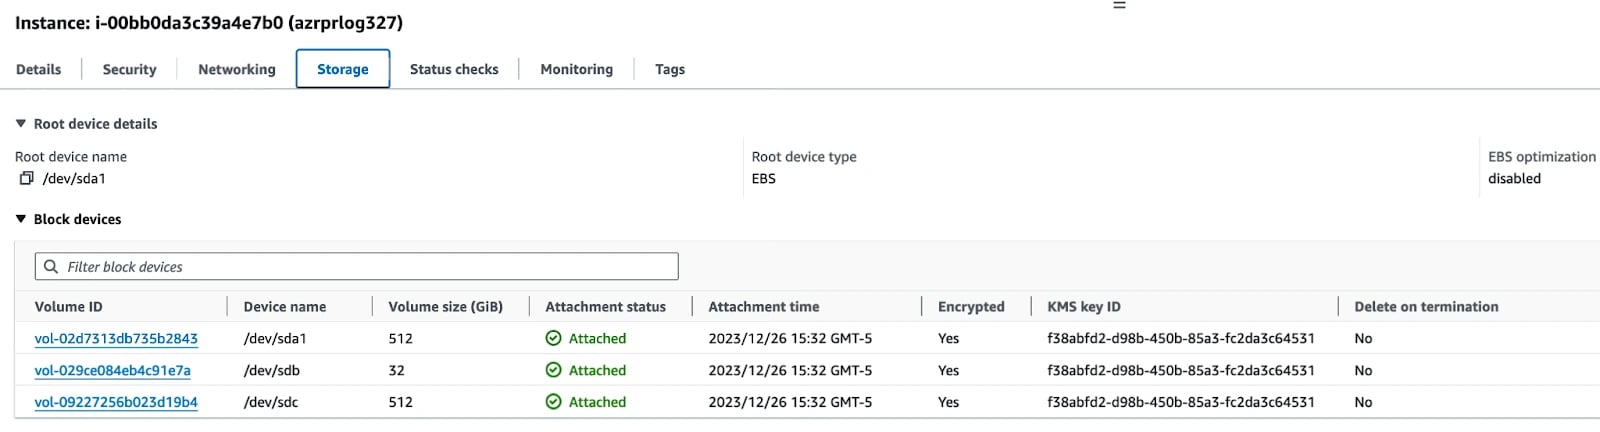
The first thing I did to begin troubleshooting was to pull a screenshot of the EC2 instance from the AWS Management Console. Upon review, we could see that the instance was not able to boot from the root storage device:

This seemed odd. The other servers had no problem booting. I decided to compare the EC2 instance’s volumes to those configured on the source server:
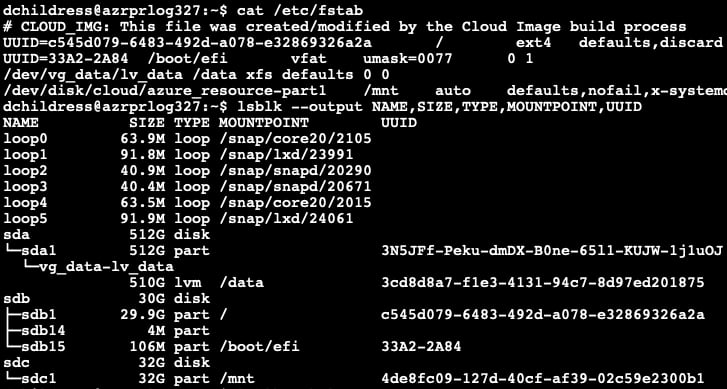
We can see that the drive mappings on the source and test server did not match. The drives were in order but the root device was erroneously configured on the EC2 instance as /dev/sda1 instead of /dev/sdb. I was not sure if this was an issue with the AWS Application Migration Service or due to a misconfiguration of the server’s launch template in a prior effort to troubleshoot.
We experienced several issues due to modified launch templates in which volumes were included, resulting in incorrectly configured drives on the test instances. The EBS volumes needed to be remapped before we could continue.
I stopped the test server (this consistently took upwards of 5 minutes, even when I attempted to force stop), took note of the volume IDs mapped to /dev/sda1 and /dev/sdb, detached both volumes, and then reattached, swapping the device mappings. That is, the volume previously mapped to /dev/sda1 was now mapped to /dev/sdb and /dev/sdb to /dev/sda1.
I then started the instance and quickly opened the EC2 serial console to watch the Linux kernel boot process, noting several errors and timeouts related to cloud-init. After several minutes, the server eventually booted to a login shell. I then attempted to open a Session Manager shell session but was unable to connect. The EC2 instance had an instance profile assigned with proper rights to SSM; it appeared that the instance did not have network connectivity.
Conveniently, a teammate had been helping me troubleshoot this test server and had recently linked me to some AWS documentation that helped explain what I was seeing:
“Azure kernels are not supported as they are not compatible with the Amazon EC2 hardware. Ubuntu servers from Azure will be required to switch the kernel to a standard kernel or the AWS tuned Ubuntu kernel 'linux-aws'.”
After reviewing the documentation, we now had an idea of what was needed in order to get this test server to launch properly.
Preparing the Virtual Machine for AWS
We needed to pre-install the linux-aws Linux kernel on the Azure virtual machine so that, once replicated to AWS, we could start the test server instance and boot Ubuntu Linux using a supported kernel. To do so, I remoted into the source server and installed the linux-aws kernel:
$ sudo apt update

$ sudo apt install linux-aws
The Second Test
After installing the linux-aws kernel, I waited a few minutes for the replication lag to be resolved and then started a new test server instance from the AWS Application Migration Service. Quickly, I launched an EC2 serial console and watched the boot process. The EC2 instance started and began to boot the linux-azure kernel.
This was still the default. I restarted the instance from the EC2 console, switched back to the serial console, and then quickly began repeatedly pressing the arrow-up key on my keyboard until I was greeted with the GRUB menu. From here, I opened the “Advanced Options for Ubuntu” menu and selected the linux-aws kernel.
Right away, I noted that there still were issues with the Linux boot process. Many errors were reported referencing various Azure services, agents, and mount points and so I rebooted the test server again and returned to the GRUB menu. This time, I selected the linux-aws (Recovery) menu option. After a few moments, I was prompted with the Ubuntu Linux Recovery Menu. From there, I selected the “root” option in order to drop to a root shell prompt and perform a little cleanup.
First, I disabled some of the services that were unable to start on AWS. Ubuntu Linux uses systemd and so I used the systemctl command to disable various services:
# systemctl --type=service

  ...

# systemctl disable hv-kvp-daemon.service

# systemctl disable walinuxagent.service

# systemctl disable walinux-agent-network-setup.service
Cloud-init was also having issues during boot time and so I reconfigured it to work properly in AWS:
# dpkg-reconfigure cloud-init
When reconfiguring cloud-init, a menu appeared asking me to select which data sources I’d like cloud-init to use to configure the instance. I unselected “Azure,” replacing it with “Ec2.”
There are some configuration files in /etc related to cloud-init that should probably be removed or disabled. I chose to disable them by renaming, leaving me the option to re-enable later, if needed:
# mv /etc/cloud/cloud.cfg.d/10-azure-kvp.cfg /etc/cloud/cloud.cfg.d/10-azure-kvp.cfg.disabled

# mv /etc/cloud/cloud.cfg.d/90-azure.cfg /etc/cloud/cloud.cfg.d/90-azure.cfg.disabled
Finally, I cleaned out the existing cloud-init configuration and rebooted the test server:
# cloud-init clean --logs

# reboot
At this point, the linux-azure kernel was still the default kernel and so I needed to re-enter the GRUB menu and select the linux-aws (non-recovery) boot menu entry. Like before, I repeatedly pressed the up arrow until the GRUB menu was displayed and then selected the regular linux-aws kernel. I noted more errors during startup but they did not block the boot process. They did, however, suggest that there were some remaining packages and files to be cleaned up from the test instance.
Once booted, the SSM Agent was automatically installed by the AWS Application Migration Service. I confirmed this from some output in the serial console and the AWS Application Migration Service console. I then logged in with Session Manager and removed the linux-azure kernel and Microsoft Azure Linux Guest Agent:
$ sudo apt purge linux*-azure linux-azure* walinuxagent
Because we had elected to replicate the temporary resource disk from the Azure virtual machine, I also needed to remove it from the file system table:
$ sudo sed -i “/azure_resource/d” /etc/fstab
Afterward, I stopped the test server, detached the resource disk (/dev/sdc, in this case), and then started the test server for one last test. The server booted successfully, without manual intervention, and without any serious errors. Success!
Launching the Cutover Server and Finalizing Cutover
The rest of the process was pretty straightforward. From the AWS Application Migration Service console, I marked testing as complete and later launched a new cutover server. The cutover server experienced all of the same issues as the test server but, fortunately, I had a game plan this time:
- Reboot the linux-aws kernel into recovery mode from the EC2 serial console.
- Disable some Azure-related systemd services and reconfigure cloud-init for AWS.
- Reboot into the regular linux-aws kernel and login with AWS Session Manager.
- Uninstall all of the linux-azure kernel packages and the Microsoft Azure Linux Guest Agent.
- Remove the temporary Azure resource disk entry from the file system table, if needed.
Once everything was cleaned up on the cutover instance and I’d verified all applications were running correctly, I finalized the cutover instance from the AWS Application Migration Service console and then stopped the source server from the Azure portal.
Experience Hassle-Free AWS Migration with StratusGrid
Migrating Ubuntu Linux from Azure to AWS EC2 doesn't have to be a draining task for you or your team. At StratusGrid, we specialize in seamless, efficient AWS migration services, ensuring a flawless transition for your business. Our team of AWS-certified experts is dedicated to optimizing your cloud usage, transforming your migration journey into a smooth and hassle-free experience.
Don't let the complexities of cloud migration slow you down. Contact us at StratusGrid today and take the first step towards a streamlined, successful migration to AWS. Let's make your cloud transition a success story!
BONUS: Find Out if Your Organization is Ready for The Cloud ⤵️