Businesses that receive or manufacture products need a mechanism to handle defects. One simple option is to assign people to receiving or production pipelines. Each worker can visually inspect each product on the pipeline, to determine “good” or “anomaly” status, and record the data. However, as product pipelines scale up, and new products are created, the number of people required to monitor those pipelines increases linearly.
Rather than adding people resources, we can build an automated solution that scales in the cloud. Amazon Web Services (AWS) provides a managed service, built on top of a foundational machine learning model, that allows you to bring your own data and teach the model what “normal” and “anomaly” quality looks like.
This service is called Amazon Lookout for Vision. Once you train a custom model on your image dataset, you can run inference against the trained model, in a production environment.
Lookout for Vision supports a couple of different inference types. First up is image classification, which determines whether the image is “normal” or represents an “anomaly.” Secondly Lookout for Vision supports image segmentation, which will accurately label the specific portions of the image that are considered anomalous.
For many use cases, classification should be adequate, but for deeper analysis, the segmentation inference can be used.
In the remainder of this article, we’ll discuss the end-to-end process of gathering data, storing your data in your AWS account, creating a Lookout for Vision dataset, training a custom model, and finally running inference against fresh data, using the custom model.
Use Cases for Image Classification with Amazon Lookout for Vision
There are many potential use cases for image classification with Amazon Lookout for Vision. Since the inference output is generally binary, the table below shows some situations where using this service can automate quality control.
| |
Normal
|
Anomaly
|
|
Vehicles
|
Smooth body panel
|
Dented body panel
|
|
Drones
|
Propeller in mint condition
|
Damage to propeller tips
|
|
Furniture
|
Undamaged furniture
|
Scratches, dents, or breaks in wood
|
|
Boxes
|
Smooth box surface
|
Scratched or punctured box
|
|
Wire Fences
|
Fence wire is pulled straight
|
Sagging or missing fence wires
|
|
Clothing
|
Fabric is in mint condition
|
Tears or staining in fabric
|
|
Roofing
|
Roof is in good condition
|
Missing or popped shingles, hail damage
|
These are just a few ideas for how you can utilize image classification to detect defects (anomalies) in various products.
Considerations for Training & Testing Datasets
One of the most important tasks you’ll perform when training a machine learning model, whether or not it’s a managed service, is building up a dataset. Generally, your input data will contain two categories:
- Data used for training the model
- Data used to test the trained model, to test its accuracy.
The data you gather will be organized into separate directories and uploaded into Amazon S3 object storage bucket. Amazon Lookout for Vision can then train on and test your data directly from the S3 bucket.
When you gather data for training, you will want to gather a diverse set of inputs. Here are some considerations you’ll want to keep in mind while you are taking training photos.
- Lighting - is your subject always well-lit?
- Angles - take photos of your product at various angles, to ensure the best detection accuracy
- Colors - does your product come in different colors?
- Backgrounds - what environment appears behind your product in a typical photo
Amazon Lookout for Vision Image Requirements
When gathering your training photos, you will need to consider the input requirements of the Lookout for Vision service. Any camera will suffice, as long as you can record JPEG or PNG compressed image files. Image files must have a square resolution, and be greater than or equal to 64x64 and less than or equal to 4096x4096 pixels. Each image file cannot be more than 8 MB in size. All of your photos must have the same dimensions as each other; you cannot mix and match resolutions.
Gather & Organize Your Datasets
Since I use an Android phone (Google Pixel 7 Pro), I chose to use the Open Camera open-source application. If you install and run that application, and click on the triple-dots, you can change the Camera Resolution setting to choose a square resolution. I used 1920x1920, which is within the boundaries of the Lookout for Vision requirements.

Next, you’ll capture an array of image files, at least 40 of both “normal” and “anomaly” examples, keeping in mind the considerations above. Transfer the images from your phone to your computer, using a tool such as ShareDrop.
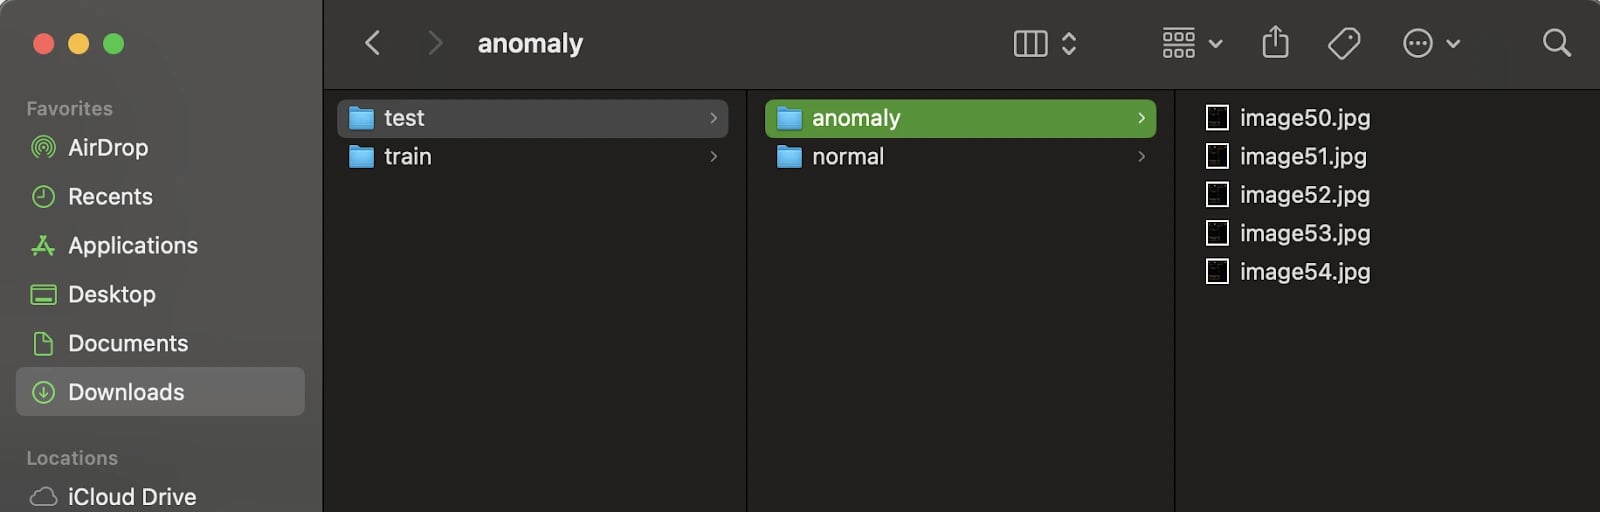
On your computer, in an empty working directory, create a “train” and “test” directory. Under both directories, create child directories called “normal” and “anomaly.” Your folder structure should look approximately like the below example.
lookout-vision\

  train\

    normal\

      image01.jpg

      image02.jpg

      ...

    anomaly\

      image50.jpg

      image51.jpg

      ...

  test\

    normal\

      image20.jpg

      image21.jpg

      ...

    anomaly\

      image70.jpg

      image71.jpg

      ...
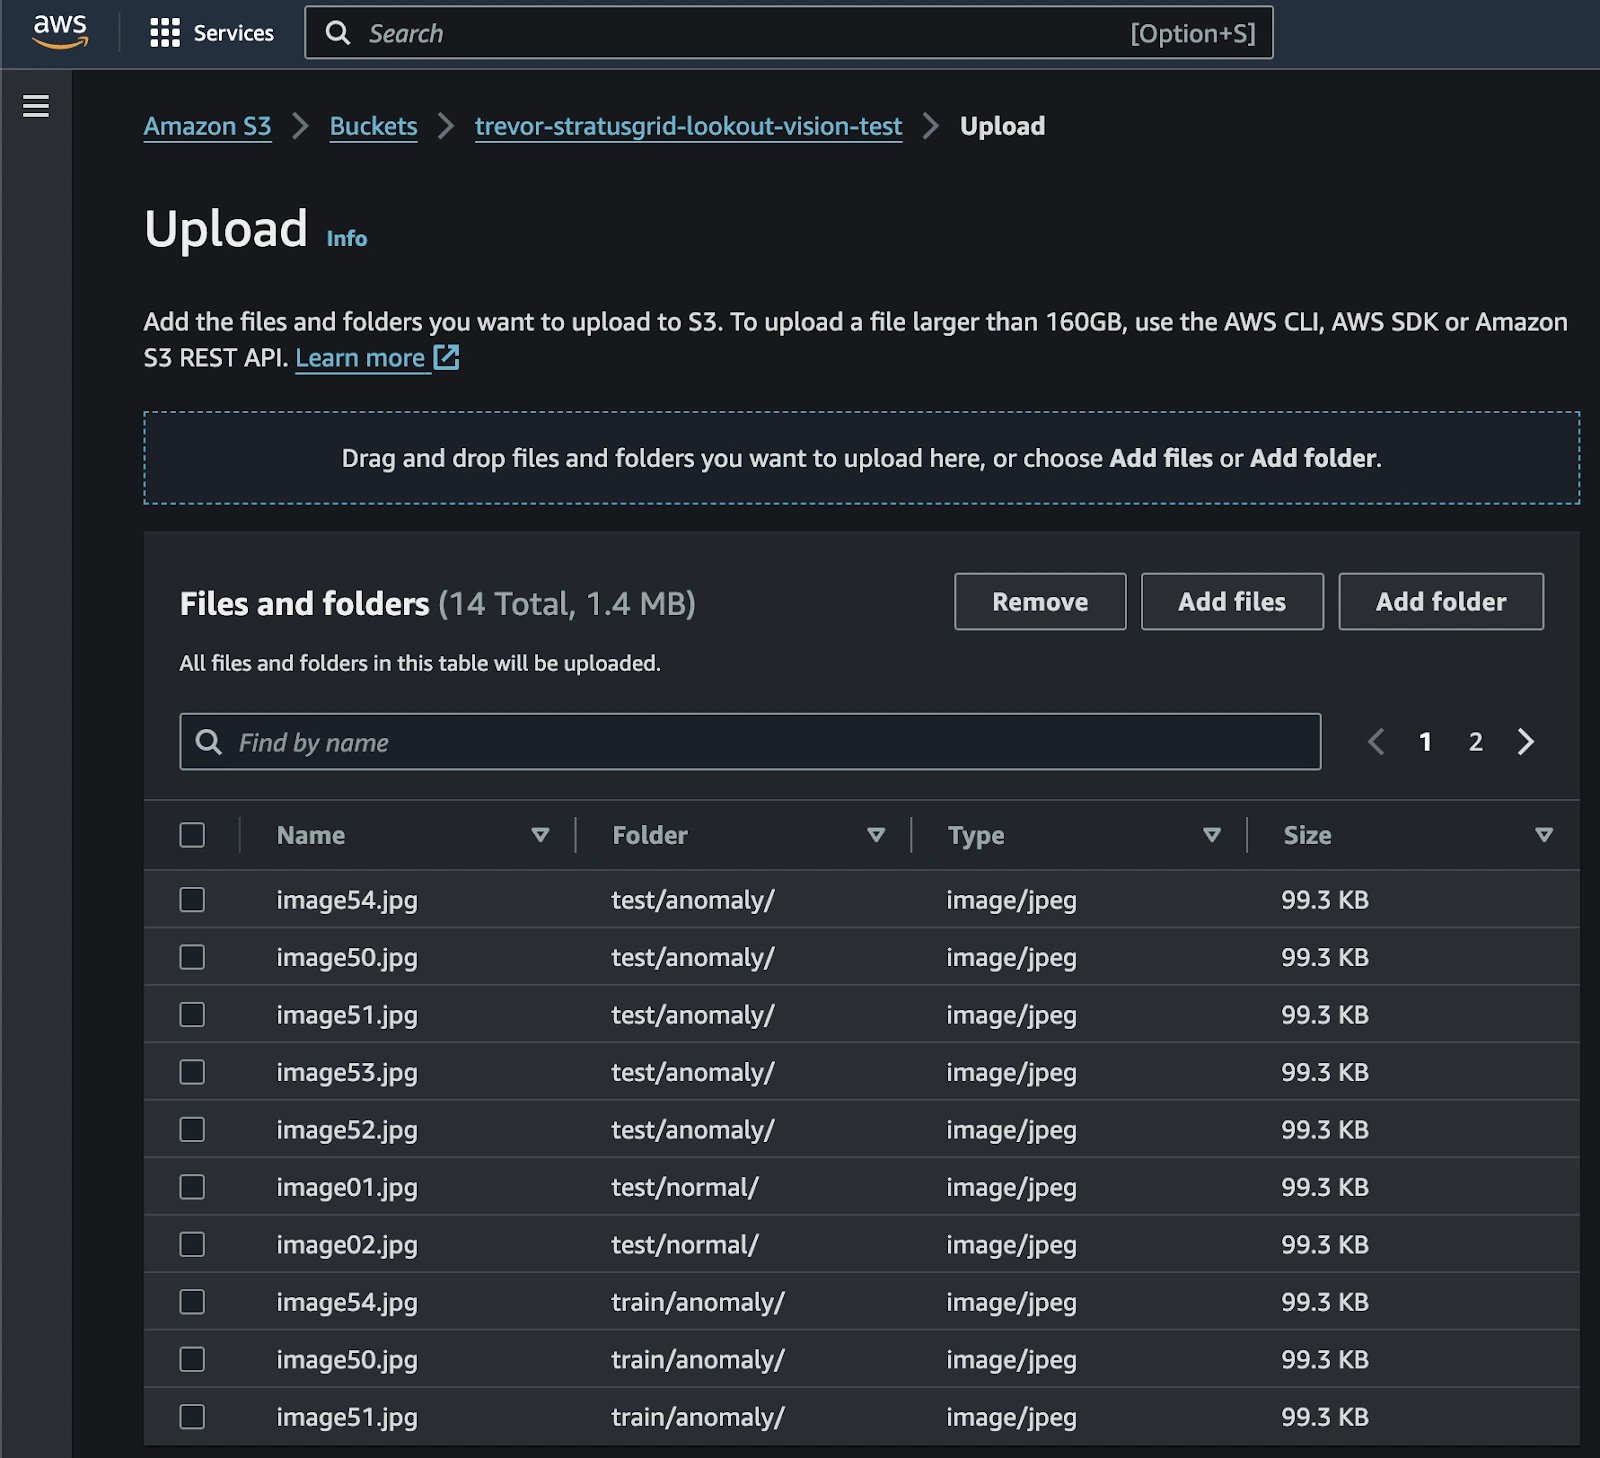
Now that you have the data structured locally, you can upload the directories into an Amazon S3 bucket. First, open up the AWS Management Console, navigate to the Amazon S3 service, and create a new S3 bucket.
Once the S3 Bucket has been created, upload both the “normal” and “anomaly” directories into it. You can open the S3 bucket in the AWS console, click the Upload button, and then drag-and-drop each directory into the webpage. Remember that Amazon S3 doesn’t technically have a “folder” concept, but rather a “prefix.”
Regardless, the user interface will show a “folder” field, which should correspond to your “train” and “test” directory structures. Go ahead and click the Upload button at the bottom, and wait for the upload process to complete.
Once the upload process is complete, your next step is to import the dataset into the Amazon Lookout for Vision service. This is easy to do, by pointing Lookout to your existing data in the S3 bucket.
Import Image Dataset into Lookout for Vision
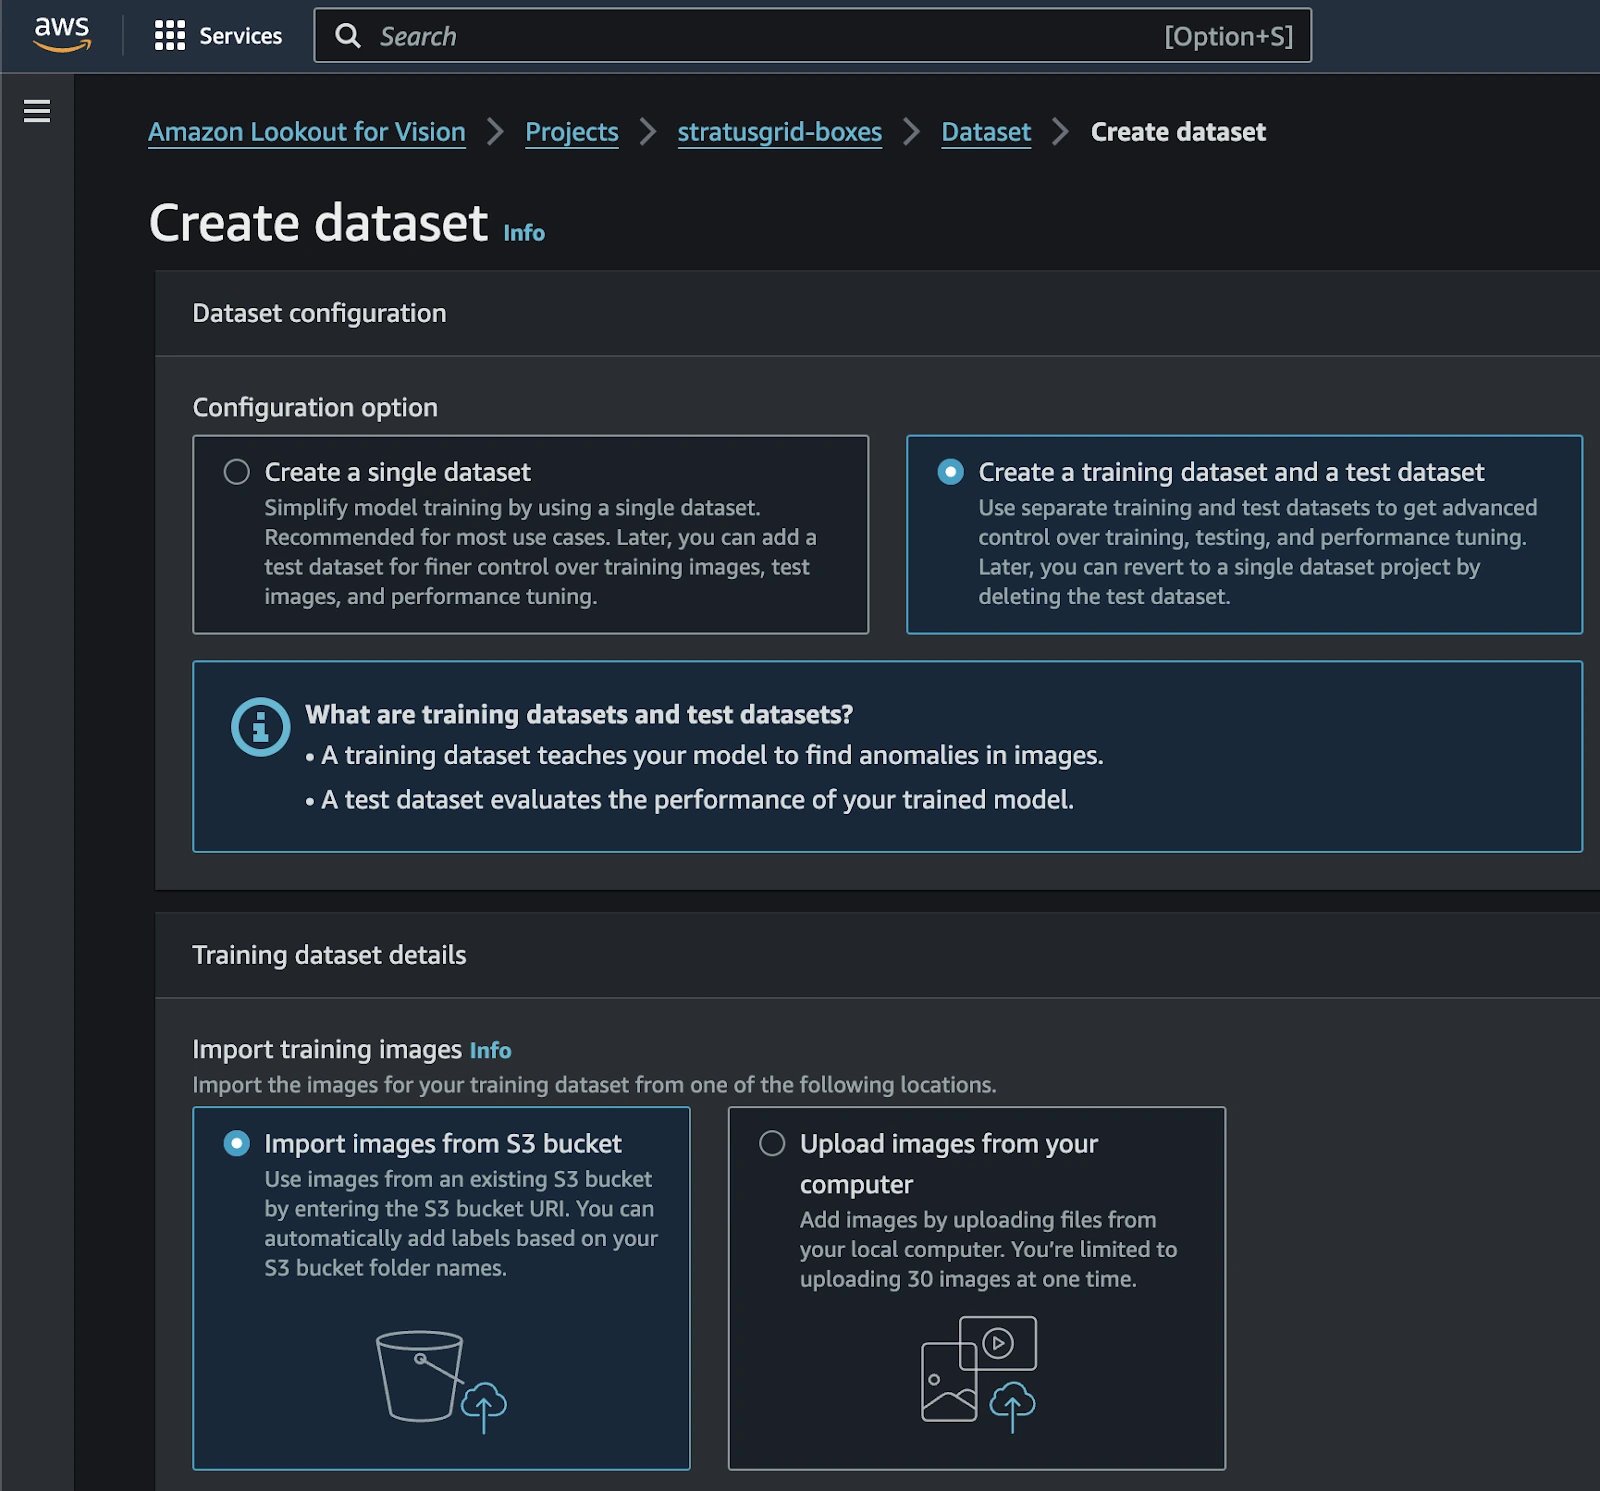
The first step to training a custom machine learning model in Amazon Lookout for Vision, is to create a dataset, by pointing the service at your existing data in Amazon S3. The resource you create is actually called a “project.”
- Navigate to the Amazon Lookout for Vision service in the AWS Management Console
- Go to Projects in the left-hand navigation area
- Click the Create Project button
- Provide a name for the project, and hit the Create Project button
- On the left-hand side, click the Dataset link
- On the Create Dataset screen, select the Create a training dataset and a test dataset option
- Configure the Training Dataset Details
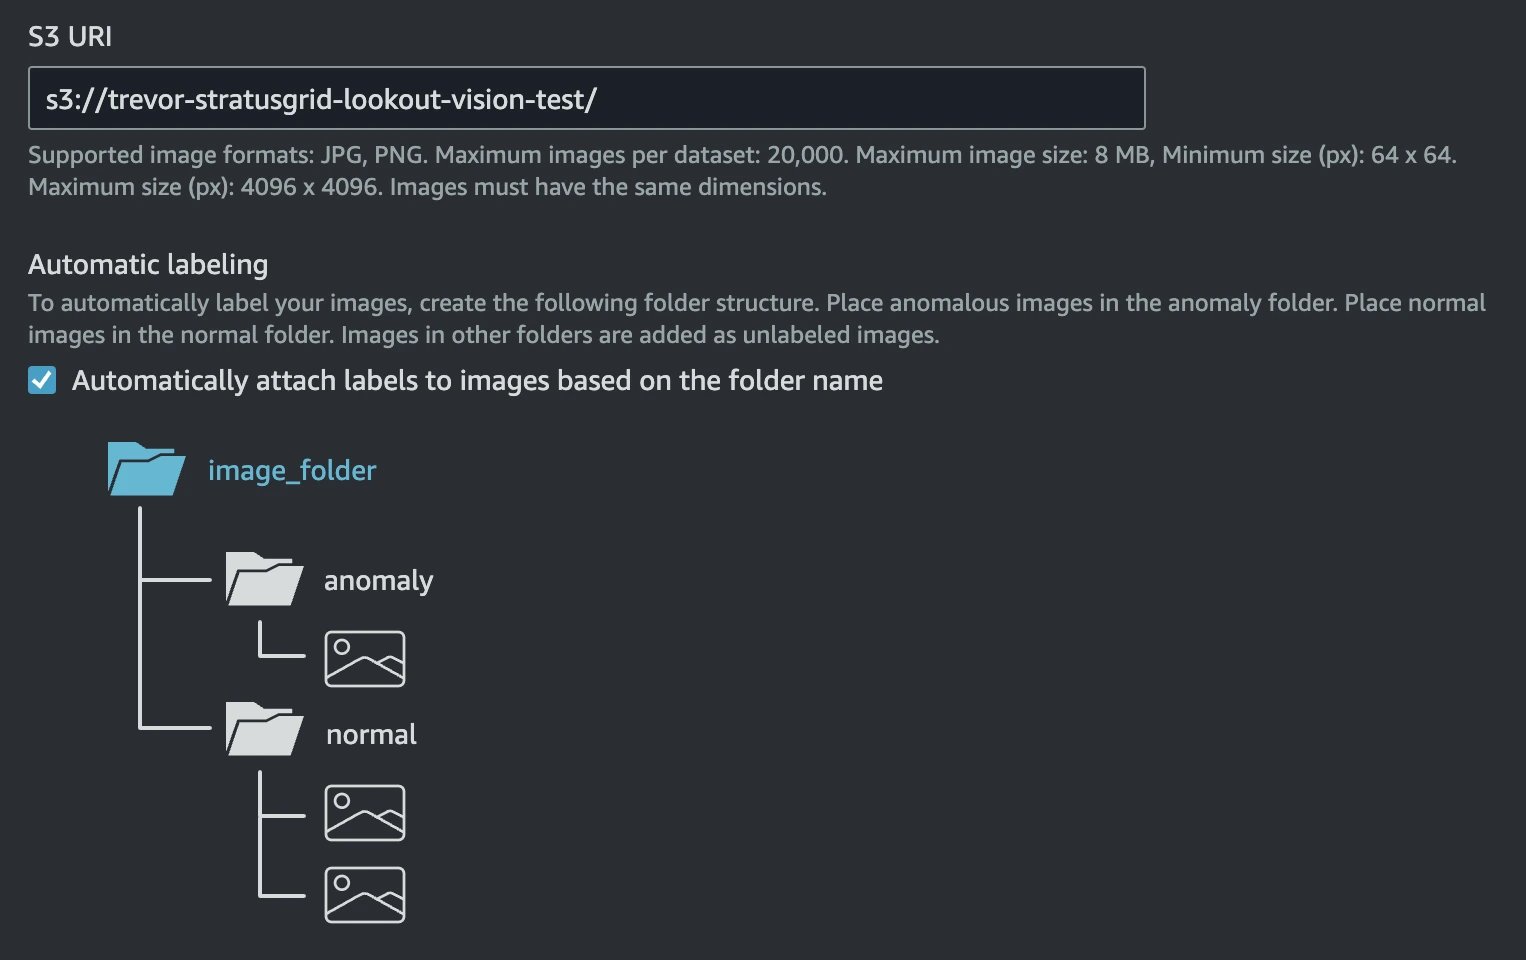
- Under Import Training Images, choose the Import Images from S3 Bucket option
- Specify your S3 Bucket URI, such as s3://trevor-stratusgrid-vision-boxes/train/ for example. NOTE: The trailing slash is imperative, otherwise validation will fail.
- Under Automatic Labeling, check the box to Automatically Attach Labels, based on the “folder” name
- Configure the Test Dataset Details
- Repeat the above step, but change the S3 URI to your test data, such as s3://trevor-stratusgrid-vision-boxes/test/ for example
- Click the Create Dataset button
You should now see two separate tabs, to switch between your training and test datasets. You’ll also notice that each of the images has automatically been labeled as Normal or Anomaly. If you want to upload any additional photos, you can go to Actions → Add Images to Training / Test Dataset. When you upload additional photos, you will need to label them as Normal or Anomaly.
Train the Model
Now that your Amazon Lookout for Vision project and datasets have been created, it’s time to train the model. This is very easy to do and avoids the need to write any code. In your Lookout project, click the Train Model button. Don’t bother changing any settings on the Train Model screen; just click the Train Model button. You’ll be prompted to confirm training again.
At this point, you can focus on other work or take a break, as model training will take some time.
After about a half hour, my test model training was completed. Surprisingly, even with a small aggregate dataset of 70 images, between training and test, the model accuracy was 100% against the test dataset.
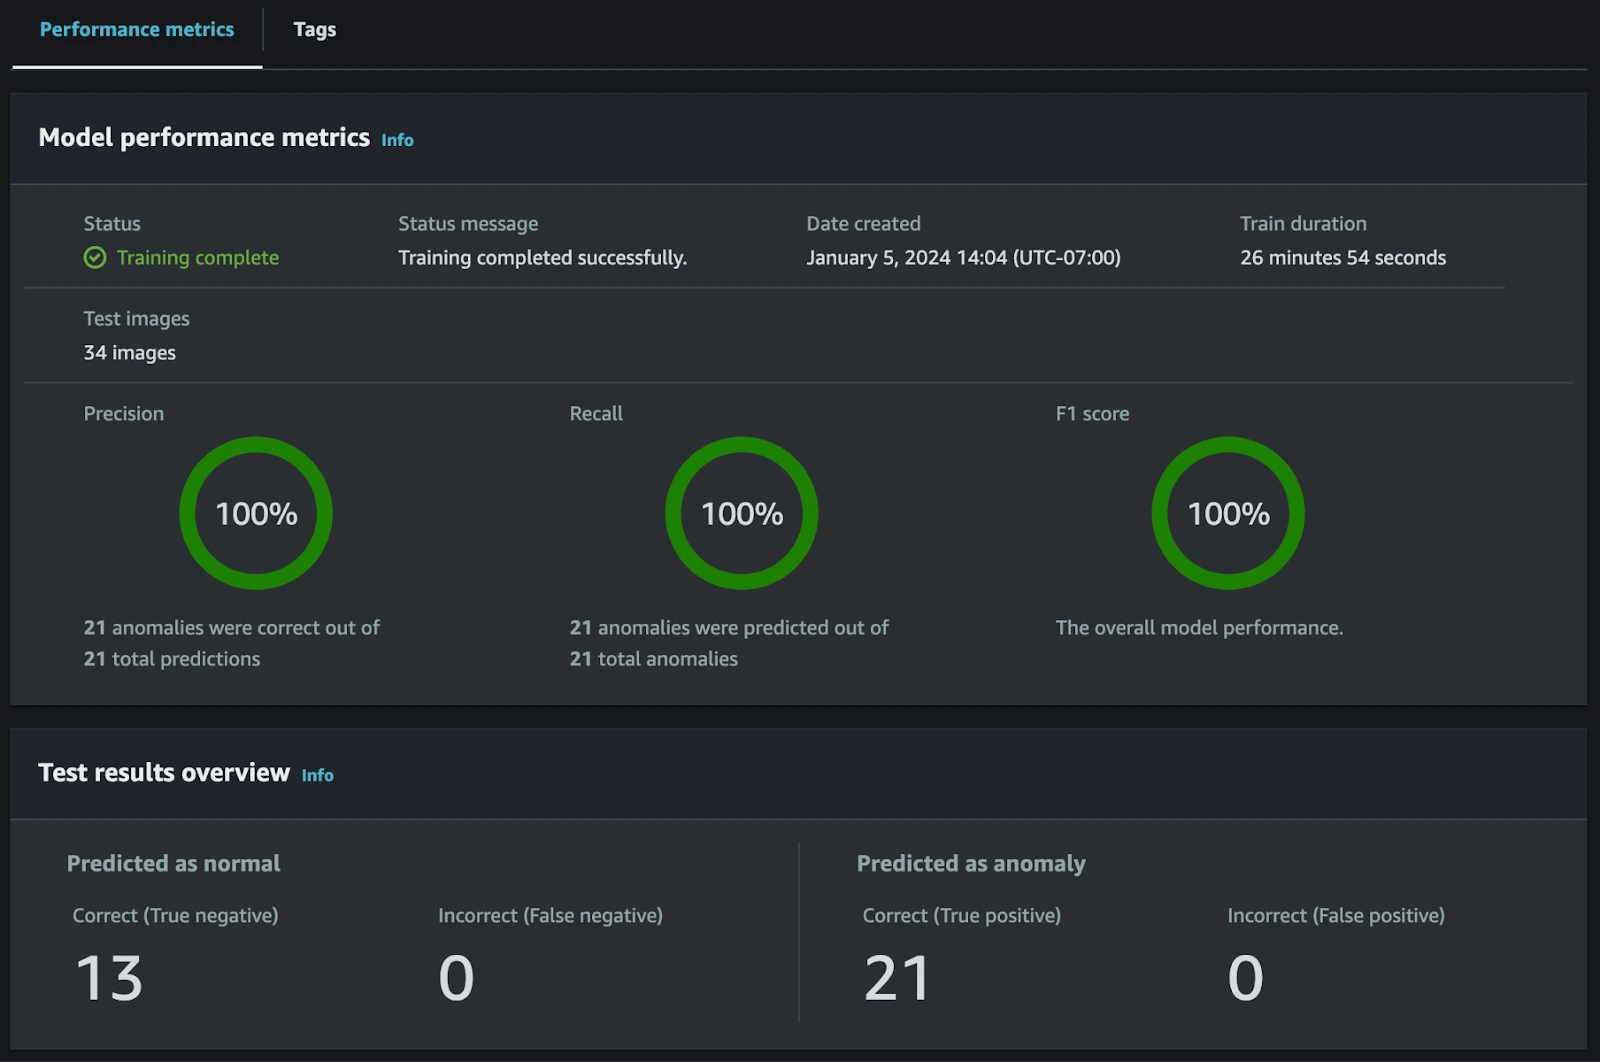
You can see the prediction (Normal or Anomaly) and confidence score for each of the images in your test dataset.

Evaluate & Improve Your Model
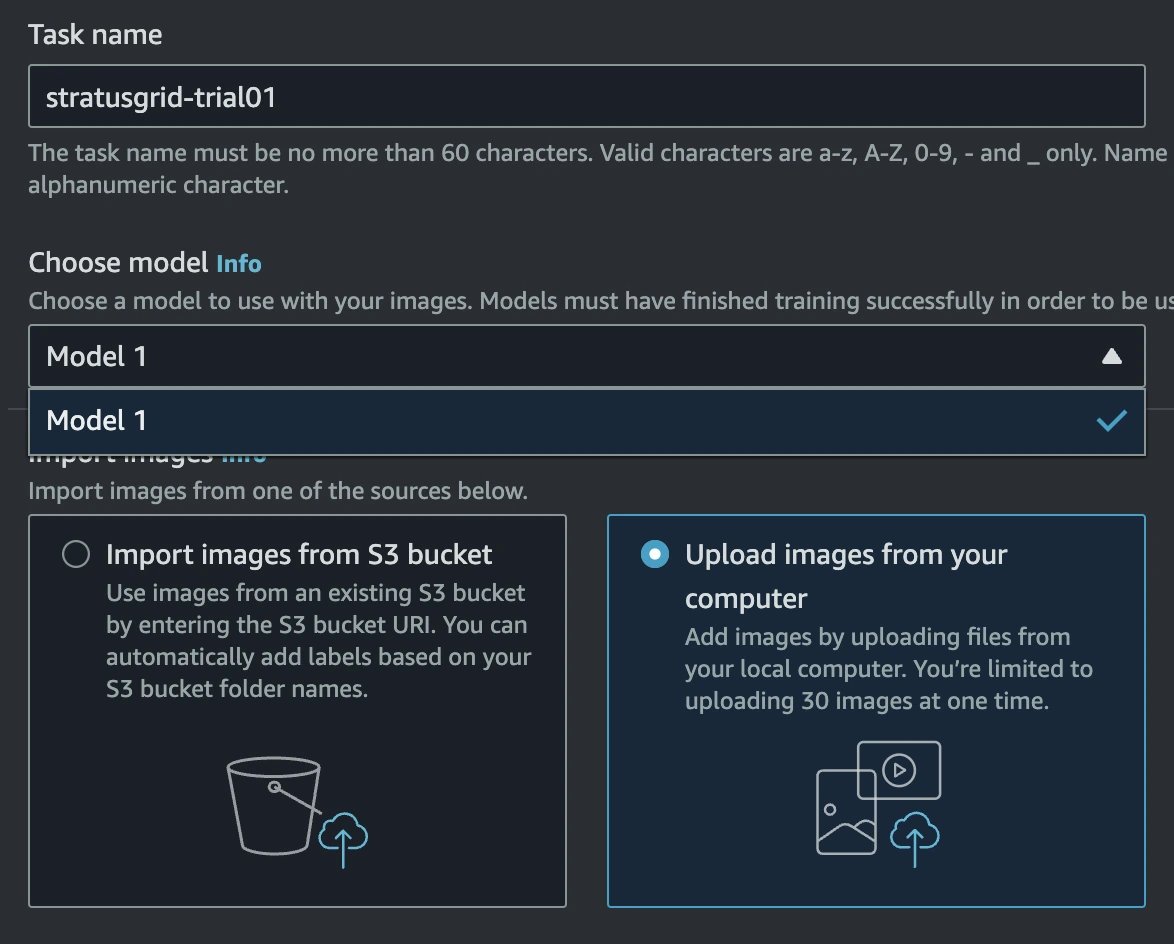
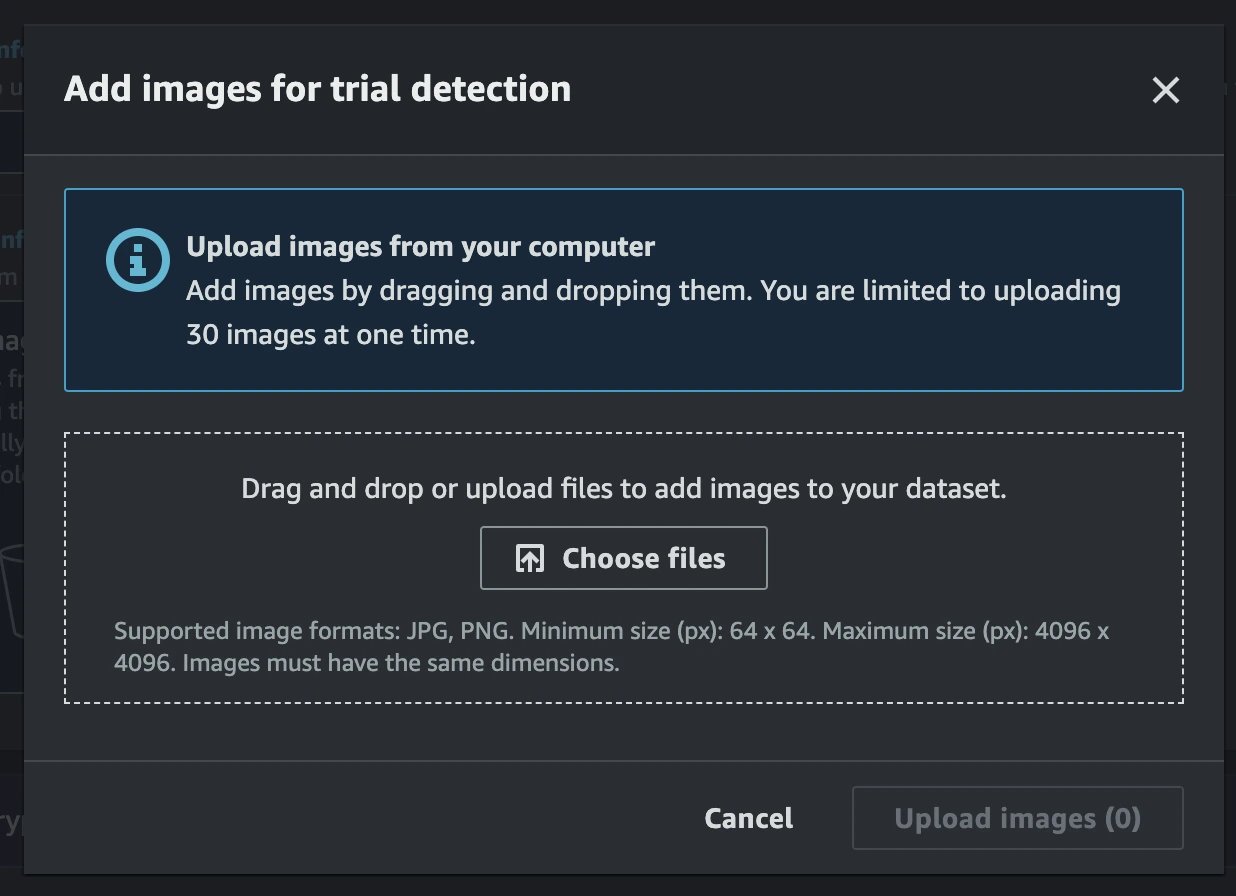
Now that you have a trained model in Amazon Lookout for Vision, you can test the model with new image files and further improve it. This feature is called trial detections. You can take additional image files, as previously discussed, and then upload these directly from your computer.
- Open the Amazon Lookout for Vision service in the AWS Management Console
- Open your Lookout project
- Click the Trial Detections link in the left-hand navigation area
- Click the Run Trial Detection button
- Enter a Task Name in the text box
- Select your Model Version from the list
- Choose the Upload Images From Your Computer option
- Click the Detect Anomalies button
- In the pop-up box, click the Run Trial Detection button
- Drag and drop the files you’d like to test into the browser
- Click the Upload Images button
After uploading your new test images, the trial detection will automatically run inference against your trained model version that you selected. Once the inference is completed, you will see the results Normal or Anomaly for each image.
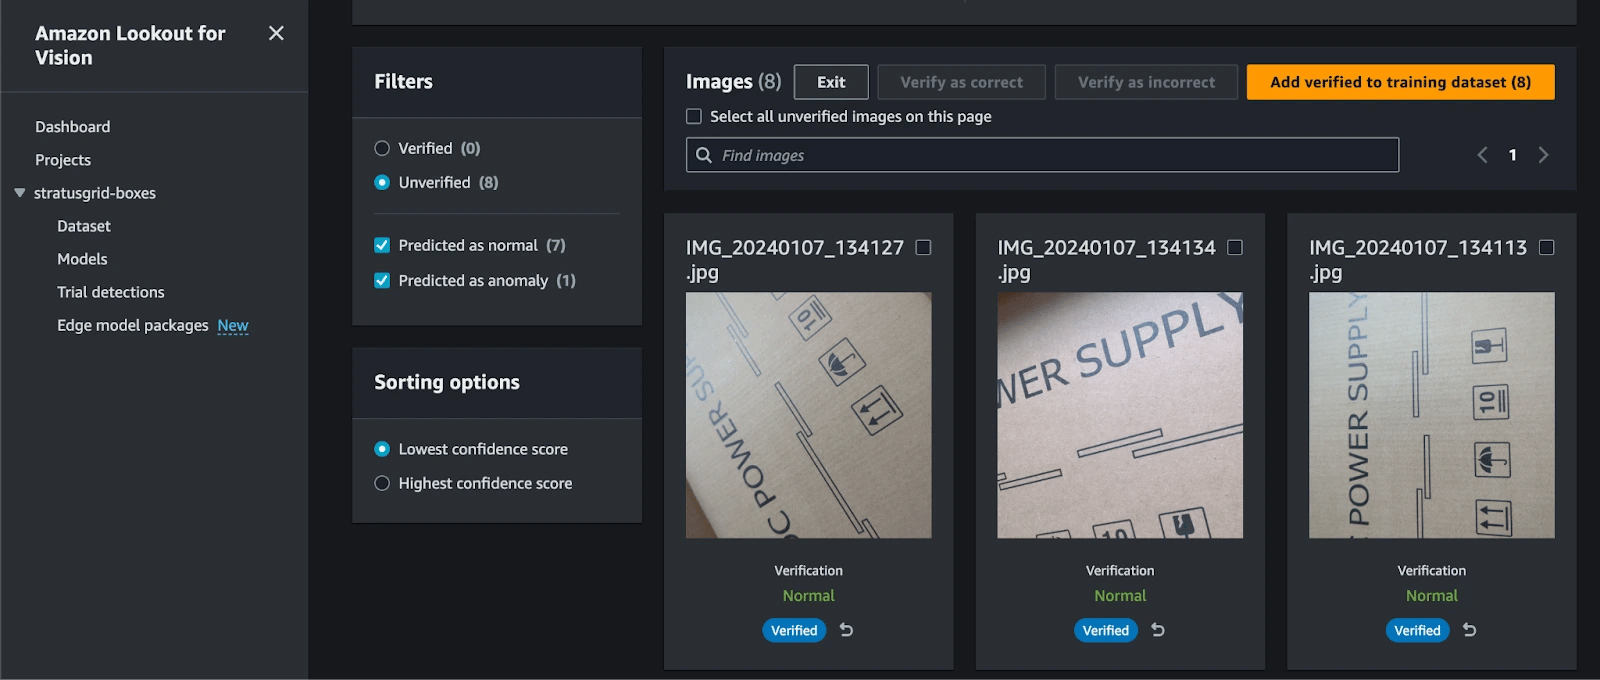
If one of the inferred values is wrong, you can correct it, add the new images to your training dataset, and retrain your model. You can repeat the trial detections as many times as you’d like to, so that the accuracy of your model can improve.
Once trial detection is done, click the Verify Machine Predictions button to initiate corrections. For each image, click the Correct or Incorrect buttons. After selecting the option for each image, click the Add Verified to Training Dataset button.
NOTE: If you receive an error message saying “The manifest must be in a versioned bucket,” then it means your S3 bucket has the versioning feature disabled. Go to your S3 bucket, enable the versioning feature, and then go back to your Trial Detection, to re-add the corrected images.
Go back to your project’s Dataset section, and you should see your new images have been added to the Training dataset. Simply click the Train Model button to train a new version of your model, with the updated dataset.
Deploy the Model Endpoint
Once your model has been trained and refined, you’ll need to deploy a model endpoint for inference. This is accomplished by calling the Lookout for Vision StartModel API endpoint. You’ll need to pass in your Lookout for Vision project name and the version of the trained model that you want to deploy. If you don’t know the model version, you can always revert to using the value latest instead, according to the documentation.
The AWS Management Console generates the AWS CLI commands for you.
- Navigate to the Models area
- Select your Model Version’s radio button
- Click the Use Model → Integrate API to Cloud option
- Copy the Start Model CLI command
- Open the AWS CloudShell service from Unified Search
- Paste your command in and hit the ENTER key
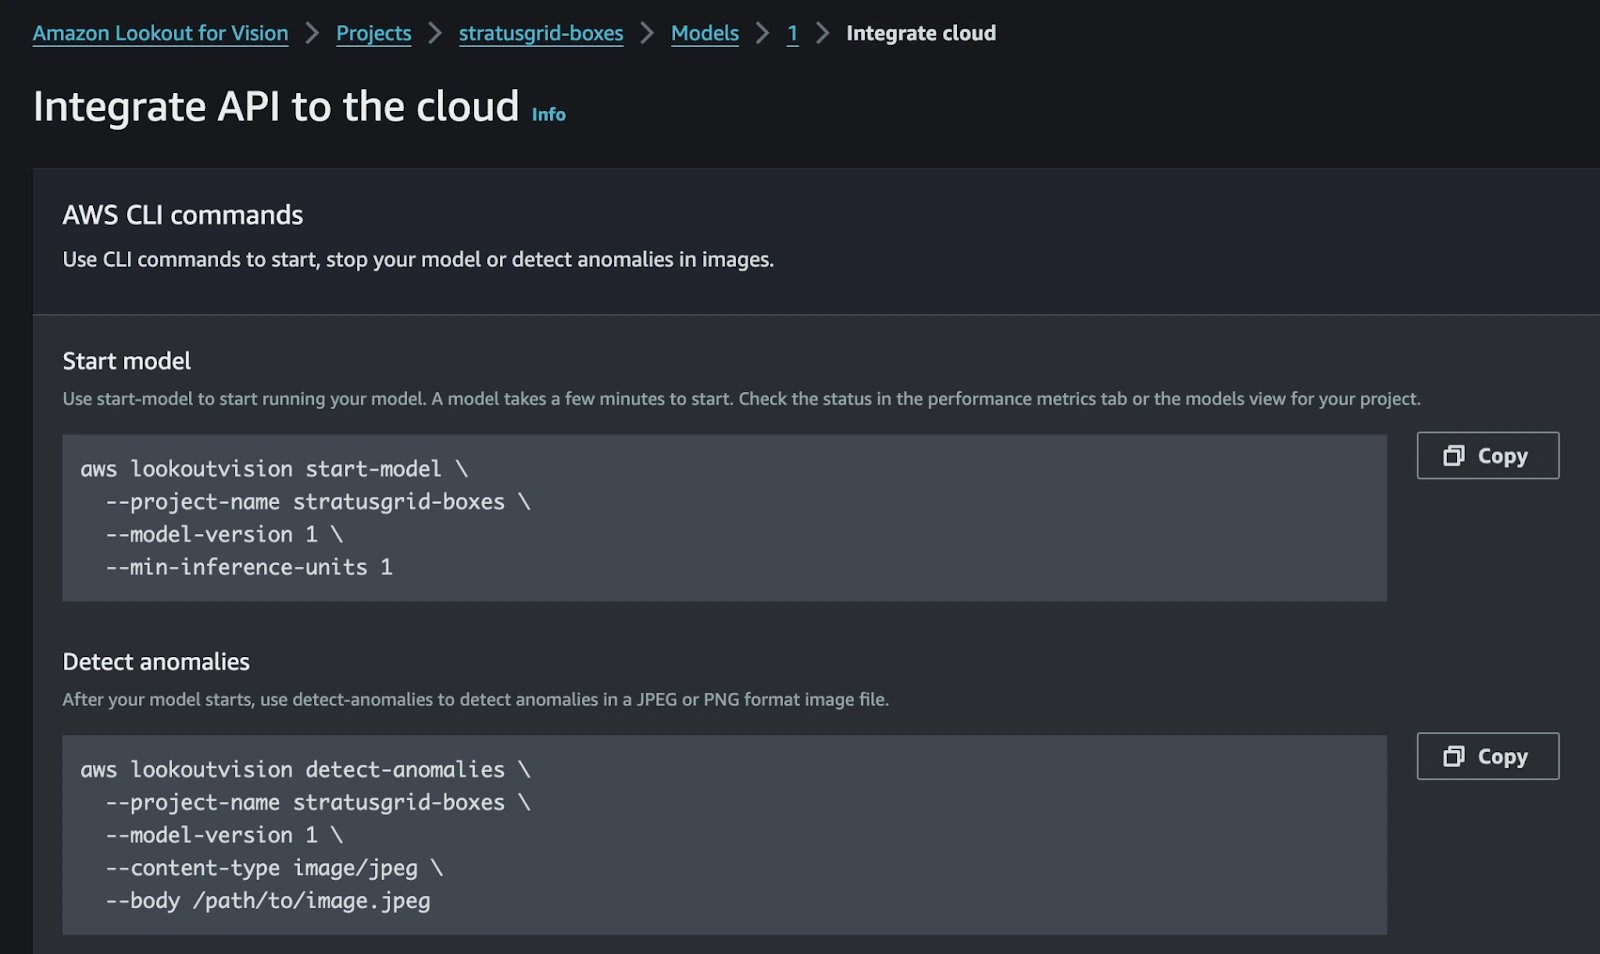
Detect Anomalies in New Images
Once the model has started up, you can then run anomaly detection against it. The underlying REST API is simply called DetectAnomalies. This API can be called by the AWS CLI or any of the supported AWS SDKs, such as those for Rust, Go, PowerShell, and others.
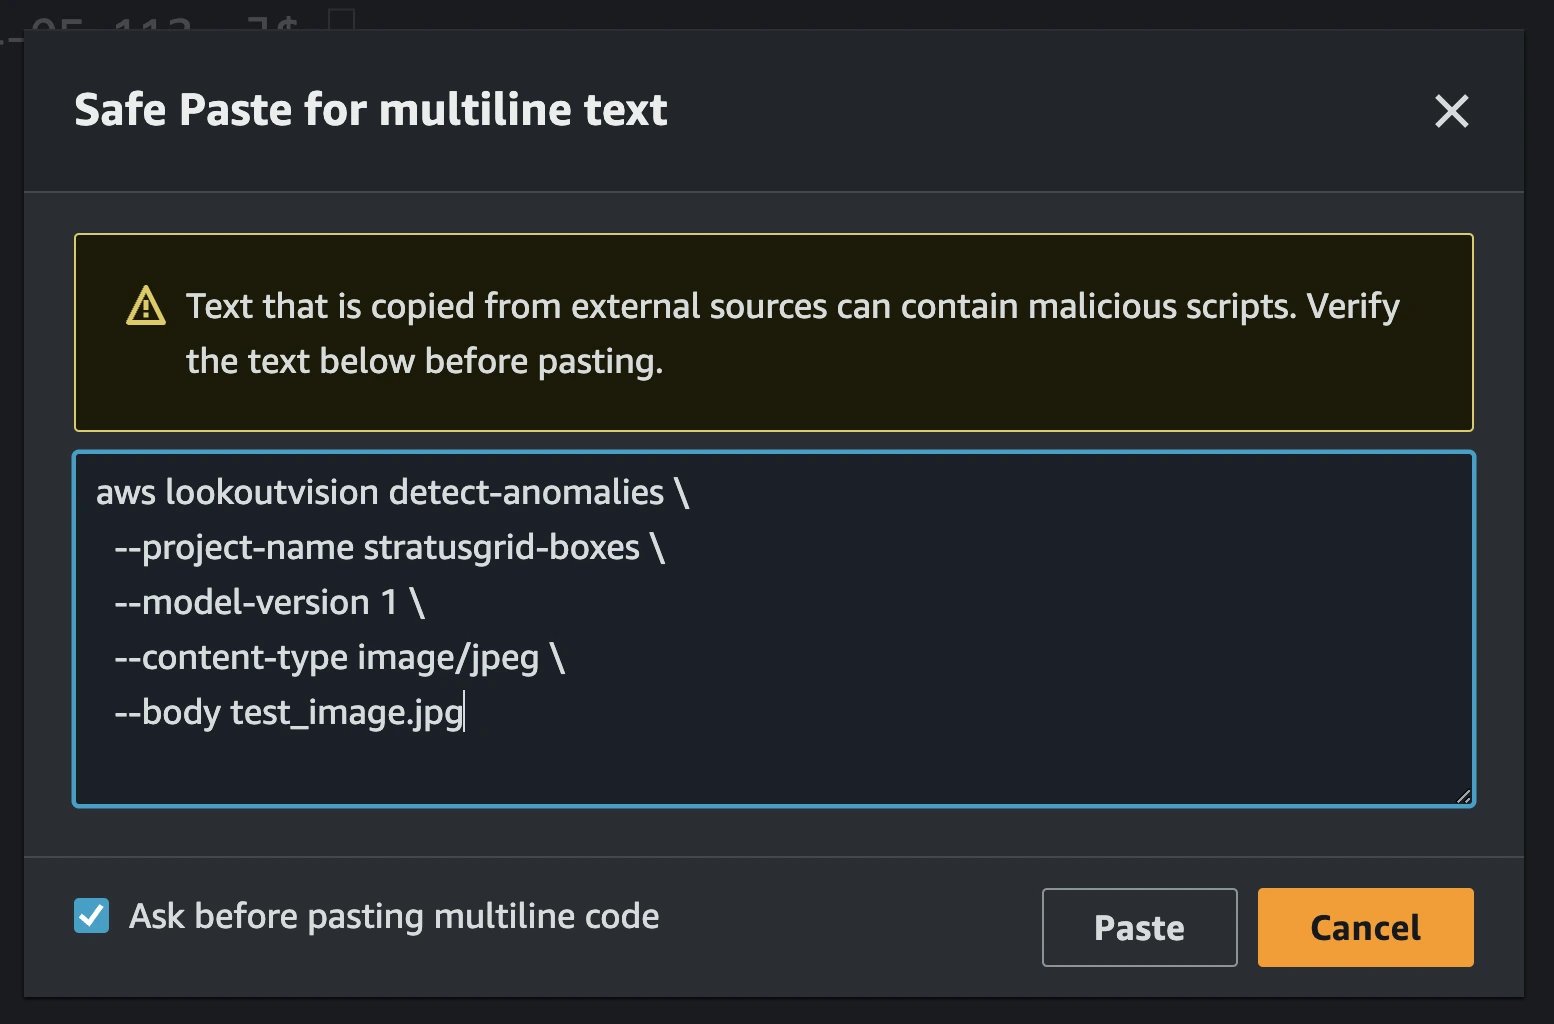
The same screen where you copied the StartModel AWS CLI command from, also includes a sample command for calling DetectAnomalies from the AWS CLI.
- Copy the Detect Anomalies example command
- Paste it into your AWS CloudShell prompt
- Change the file path to test_image.jpg before hitting the Paste button
- Upload a file named test_image.jpg to CloudShell, using the Actions → Upload File option
- Hit ENTER to run the CLI command
The resulting JSON output from the API should indicate whether an anomaly was detected or not. Here’s an example of the output structure you should receive.
{

    "DetectAnomalyResult": {

        "Source": {

            "Type": "direct"

        },

        "IsAnomalous": true,

        "Confidence": 0.9427406191825867

    }

}
IMPORTANT: Make sure that you stop the model hosting after you’re finished testing it out, unless you plan on running it in production. As long as your model is in the running state, you will be billed by AWS for inference hours. Check out the Amazon Lookout for Vision pricing page for more details.
Next Steps in Automated Quality Control
Now that you understand how to use the Amazon Lookout for Vision service, it’s time for you to think about how this fits into your manufacturing pipeline! Once you’ve identified one or more use cases for this service, you can start by gathering your dataset, organizing it, uploading it to S3, and importing it into the Lookout for Vision service. Once you’re done creating your dataset, you can train your custom model, refine it, and host it for inference.
Here are some other ideas for how you can integrate the Lookout for Vision service into your business operations.
- Develop an automated service to capture images from cameras, and run inference on them.
- Store the inference result in a persistent database, such as Amazon DynamoDB or RDS.
- Wrap your production workflows in AWS Step Functions to visually orchestrate a variety of operations with your data.
- Learn how to deploy your Lookout for Vision model at the edge for improved performance.
Ready to transform your manufacturing quality control with the cutting-edge capabilities of Amazon Lookout for Vision? StratusGrid is here to make that transition seamless and impactful. Our team of AWS-certified experts specializes in integrating advanced AI solutions like Lookout for Vision into your existing systems, ensuring precision, efficiency, and scalability.
Let's collaborate to redefine excellence in your manufacturing processes. Reach out to the StratusGrid team to discuss your projects today!
BONUS: Find Out if Your Organization is Ready for The Cloud ⤵️